The Olympus Project: Part 36 “Final Thoughts”

This completes our series on the Olympus Project. This was quite an involved project and resulted in a number of blog posts. Even with all of the posts in this series, we didn’t cover everything.

For a more detailed account of the entire project, we have created “The Olympus Project” project manual. The project manual is over 130 pages and contains everything in these blog posts plus more detailed descriptions of what we did and how we did things. There are more pictures showing the process. The complete Arduino code is included, a listing of all the parts necessary and coverage on how to create the necessary vent holes for accurate altimeter pressure readings.

We also cover how to create the 3D printed stand for the rocket, discuss the differences between the Scientific Method and the Engineering Process. We also provide an introduction to the purpose and use of engineering notebooks. As you can see, the project manual contains much more information than what we have provided in these blog posts (https://rocketryjournal.files.wordpress.com/2023/12/olympus-payload-v1.0.pdf).

This manual is free of charge and can be downloaded from our Project Manuals page. There you can find project manuals on Project: Icarus, the Arduino Launch Control System, the Arduino Primary Avionics Module (A-PAM) and more (https://rocketryjournal.wordpress.com/project-manuals/).

You can also view our YouTube page that contains videos covering all aspects of the building of the Olympus and the avionics package (https://www.youtube.com/@AustinAerospace/playlists).

You can download the full Arduino source code from our SourceForge page (https://sourceforge.net/projects/olympus-project/). Here you can find not only the code for the Olympus Project, but other projects such as Project Icarus, Flight Logs, Rocketry Research Assistant, Arduino Primary Avionics Module (A-PAM) and more (https://sourceforge.net/u/austinaerospace/profile/).

Finally, we want to ask for your feedback. With this build, we had 35 posts covering construction of the rocket and the avionics. When we did Project Icarus, we simply released the Project Manual and didn’t create any posts concerning building the rocket or the avionics package. Which do you prefer? A series of blog posts that accompany the Project Manual; just release the Project Manual and use the blog posts for other topics; or some combination of blog posts with the Project Manual? Leave your preferences in the comments below. This will help to guide us in future project releases.

We hope that you have enjoyed this project build and that we can bring similar builds in the future.

The Olympus Project: Part 2 “Project Planning”

As with most research projects you start by sitting down and figuring out exactly what you want the project to do. What is the end goal or primary objective? What tasks need to be performed successfully for the project to be completed?

The Olympus Project is an engineering project, much like Project: Icarus. Where Project: Icarus was designed to test the temperatures inside a model rocket, the Olympus Project is being designed to test electronic payload attachments along with the Arduino Primary Avionics Module (A-PAM). In this case, we are going to be testing two specific sensors; a pressure sensor to detect altitude and an Inertial Measurement Unit (IMU) to test things like g-forces and rocket spin rates.

There are several ways to track this. You can keep a written notebook and write down your ideas, the tasks that need to be accomplished, etc. You could also keep the same information on your computer. You might use a spreadsheet or document to keep track of things. Another option would be to use a Project Management program (some which are quite involved and can be expensive). We have one other option and that is the use of our own Rocketry Research Assistant (RRA). With this project, we will be using a combination of these options.

The Rocketry Research Assistant

We will start this project by using the RRA. At the time of this writing the first version (0.1) has been released and it is limited in scope and function (It can be downloaded from SourceForge at https://sourceforge.net/projects/rocketry-research-assistant). However, by using the software now in a real life project we can test it to see how well the software works even at this early stage. It will help us find issues with the software or areas where the software feels clunky. It will also provide us with ideas on how we can improve the software.

Because the RRA is limited, we will keep track of the project  by going old school. Instead of a computer we will keep our notes in two separate spiral notebooks. One notebook will be used to track the construction of the rocket. A second notebook will be used to track the progress on the electronic payload (We will also be keeping a third notebook that is tracking the development of the RRA). Lessons learned from this project will be used to improve future projects and the RRA software.

Getting Setup

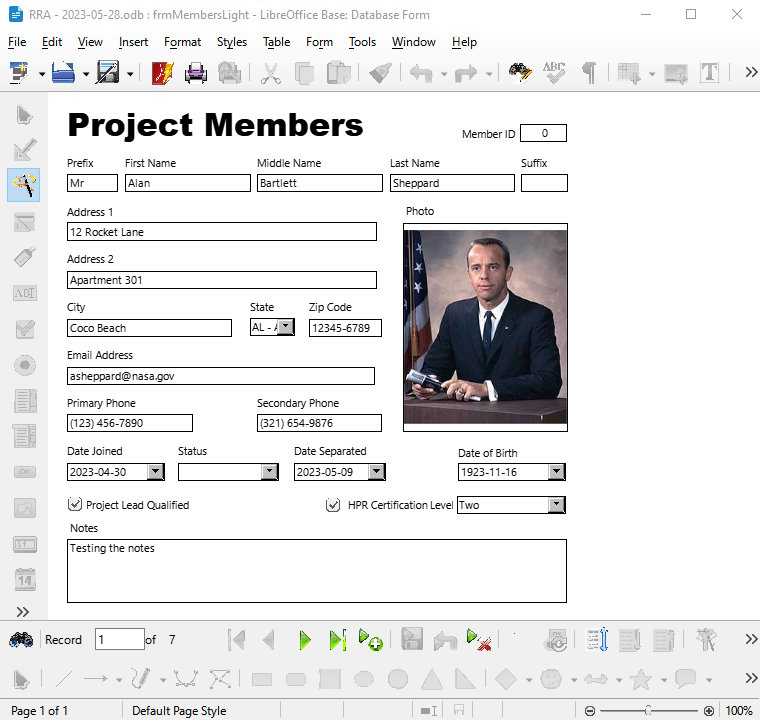
Before we can use the RRA to track our Olympus project, we need to do some preliminary setup. The first thing is to input at least one member in the Project Members form. This needs to be done so that an individual can be assigned as a Project Lead on a project, as well as being assigned to the various tasks that need to be accomplished.

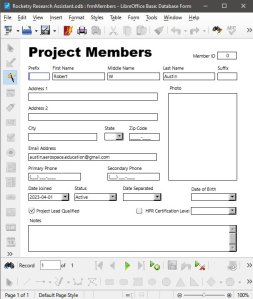
In my Project Member’s form I only have one name, as I am working on the project alone. This will likely be common for those who are working by themselves on projects. However, if you are working with a team on a project, all members of the team should be entered into the database. How much information you enter is up to you. As you can see in the screenshot above, only a few fields have been entered. Once the members have been entered, we can begin setting up our project.

Setting Up a Project

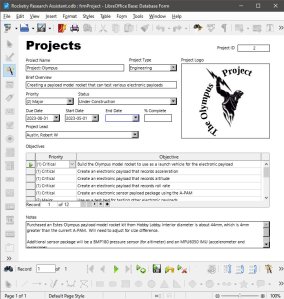
The next step is to set up our project in the Projects form. Start by opening up the Projects form in Base. Once it is open, we need to enter the name of our project, in this case “Project: Olympus”.

Next is a drop-down box for the type of project. A number of options are available, including:

  • Avionics
  • Database
  • Engineering
  • Ground Support
  • Launch Vehicle
  • Report
  • Research Payload

For this project we have selected “Engineering”.

The next entry allows us to provide a simple overview or description of the project. For this project we entered, “Creating a payload model rocket that can test various electronic payloads.” The hope is that the Olympus project will be used as a test bed for various electronic sensors and, later, cameras. This is why we have labeled this an Engineering project. Its purpose is to test other systems.

The next series of entries deal with the progress of the project as well as important dates. This includes:

  • Priority (1-4)
  • Current status of the project
  • The date the project is due to be completed
  • The date the project started
  • The date the project ended (this is not the same as due date. The end date may be the same as the due date, but may be sooner or later)

The final item in this section is the project lead. This is the person responsible for the management of the project.

Note: Future versions of the Rocketry Research Assistant will include the option to list all the members of the project team.

The middle section of the form allows you to enter a number of objectives. Here you can enter a description of the objective and it’s priority. For the Olympus Project we have included a number of objectives. Some of these include:

  • Create an electronic payload that records acceleration
  • Create an electronic payload that records altitude
  • Create an electronic payload that records roll rate
  • Create an electronic sensor payload package using the A-PAM

These types of objectives help us make decisions concerning the design and construction of the vehicle. By including the A-PAM device it lets us know the minimum diameter of the payload bay to accommodate the A-PAM. The objectives on acceleration, altitude and roll rate can help guide us in selecting the electronic sensors that we will need to use.

The bottom part of the form contains a Notes section. This can be used to capture any information about the project that is not collected elsewhere. You can see where we have entered the purchase of the Olympus payload model and are looking at a BMP180 to measure altitude and a MPU6050 to measure roll and acceleration.

This type of record keeping is important for any research or engineering project. It can help keep a project on track by clearly stating what are the objectives of the project and the date they have to be completed. It also identifies who has the overall responsibility for the project.

At this stage of the process the basic planning of the project is complete, the premise of the project is outlined, and the objectives of the project are written down. We can now move forward with the construction of the project.

The Olympus Project: Part 1 “Overview”

This project is a multipart engineering project that is designed to introduce the concept of building a payload model rocket kit, creating a custom designed electronic payload, and tracking your progress using the Rocketry Research Assistant software. We want to show that anyone can create an interesting rocketry science/engineering project using common rocketry kits and electronic components that are readily available.

The Rocket Kit

The model rocket kit we are using is the Estes Olympus payload model. It is sold through Hobby Lobby stores or through their web site (https://www.hobbylobby.com/Crafts-Hobbies/Hobbies-Collecting/Rockets/Olympus-Flying-Model-Rocket-Kit/p/80971713). It retails for $16.99. The model is just over 29-inches tall and 1.75-inches in diameter. It can fly on a variety of motors including D12-3, E12-4, D12-5, Or E12-6.

The Electronic Payload

The electronic payload that we will be developing in this project is an altimeter with a motion controller. We will create our payload using the Arduino Primary Avionics Module (A-PAM) and then adding the necessary components for the altimeter.

We will be using an Arduino Nano as the primary microcontroller. The Arduino Nano makes a great entry level board and it is readily available from a variety of sources. It has a large support network behind it including numerous web sites that offer advice, sample code, insight into the inner workings of the board and more.

The Arduino IDE is the programming software that we will use to develop our code. It is quick to learn and easy to use for the person that is just starting out doing microcontroller programming.

The Nano coupled with the Arduino IDE makes it an ideal platform for someone that is new to using microcontrollers and building electronic payloads. While there are other controllers that are more capable, chances are if you are aware of these other microcontrollers you are beyond the scope of this project anyway.

The Rocketry Research Assistant

At the time of this writing the Rocketry Research Assistant (RRA) is only at Version 0.1.0. Despite this early release version we are going to incorporate it into this project. This will allow us to track the progress of the project as we work through it. It will also let us define our objectives and tasks that need to be performed as part of this project.

The other advantage of incorporating the Rocketry Research Assistant at this stage is that it allows us to test and update the software. We can see issues that may arise while using the software. It also helps provide us with ideas of what should be incorporated into the next version of the software, and if our development road map is working as it should.

Our Goal

The overall goal is to develop a working payload launch vehicle that can be incorporated into a science or engineering project. By incorporating the RRA we begin the Project Management process that is important to any research project.

This project should be thought of as just the beginning. While you will have a working payload model when finished, you should also be thinking about how the project can be improved and modified to meet specific research project needs.

Additional Resources

In addition to this project manual there are a number of resources that are available to help you along the process. This includes

  • Videos of the construction process
    Visit our YouTube site for videos on building and finishing the Olympus, as well as construction the electronic payload.
    https://www.youtube.com/@AustinAerospace
  • Payload Avionics Mount
    The design of the avionics bay will be posted on Tinkercad. The STL files will be made available through Thingiverse
  • Arduino Software
    The software used to make the electronics come to life will be posted to our SourceForge page in the near future
  • Rocketry Research Assistant
    The latest version of the RRA can be found in our SourceForge repository
    https://sourceforge.net/projects/rocketry-research-assistant

At the conclusion of this series we will posting the complete Project Manual to our library. As with our other items, it will be available for free.

Initial Release-Rocketry Research Assistant

We are pleased to announce the release of the Rocketry Research Assistant Database Project, Version 0.1.0. This database is created using LibreOffice Base and the embedded HyperSQL database engine.

This release starts building the foundation of this database. It includes three basic forms (Projects, Team Members and Tasks) and the foundational tables. Included in the SourceForge download is a copy of TR-11 “Introduction to Database Design” and the accompanying Project Manual, “Creating the Rocketry Research Assistant-Part 1”. The Project Manual takes you step-by-step through the design and creation of the database. The Project Manual has a number of screen shots and a detailed appendix.

Every research project will collect a multitude of data. Some of that data will be on the performance of the launch vehicle, some may be on the sensor readings in the payload, and some will be on the development of the research project itself. This database project is designed to get you started in understanding, designing and creating databases. To make you aware of how databases work. To help you understand how they can be helpful in your research projects. To let you know that you can develop basic database programs and skills that can be immensely beneficial to you and your team.

The initial release of the project can be downloaded from our SourceForge repository at https://sourceforge.net/projects/rocketry-research-assistant. The Zip file includes the database, the Project Manual and TR-11 “Introduction to Database Design”. You will need to download LibreOffice (https://www.libreoffice.org) to allow you to design, create and run this database.

Creating an Educational Project

When developing an open source database program it is typically developed in sections and then released to the public. This is the process we used during the development of Flight Logs. This time we decided to do something different. We wanted the development of the Rocketry Research Assistant to be used not just as a database, but as an educational project as well. This would allow us to not just provide a new database that students and rocketeers can use, but also show how the database was developed. The result is the creation of a Project Manual to accompany the development of the RRA.

The database project created here is intended to be the foundation of your future database projects. By creating this project you will learn the basics of database creation. The next steps are up to you. Do you want to expand the project with additional forms, tables and reports (we will discuss this in more detail during the review process at the end of the manual)? Do you want to create a new database that helps with the project you are currently working on? You might want to look at how to share the database among other team members by taking the database and splitting it into a front end and back end.

There is also the option of incorporating the spreadsheet program Calc into the project to crunch numbers from a data collection research project. Or include it in the word processor Write to help create your research project reports.

Development Issues with Microsoft Access

Our previous database development efforts had revolved around Microsoft Access. The Flight Logs database was developed using Microsoft Access 2010. It used the Access runtime module to allow anyone to run it on their Windows computer without having to install Access on their computer. We recently several issues with continuing to develop the software using Microsoft Access in a previous post.

It is very discouraging to invest the amount of time in developing a program such as Flight Logs and see a warning banner indicating it is “security risk.” Such “warnings” can give the impression the other items I provide through the web site are also a security risk. When we combined the limitation of Access being Windows only along with the updates by Microsoft to restrict the use of Access (and Access 2010 in particular), it was decided that we would begin to transition to another database management system.

Transition to LibreOffice Base and HyperSQL Database

LibreOffice Base helps us address the issues that have been identified with Access and the Windows operating system updates. LibreOffice is able to run not just on Windows (Version 7 or greater) but Mac OS, and Linux. There are unofficial version that run on Android, iOS, Chrome, FreeBSD, OpenBSD, NetBSD, Haiku and Solaris. It is also available on a number of platforms including x86-64, IA-32, ARMel, ARMhf, ARM64, MIPS, MIPSel, PowerPC, ppc64le, S390x, and VLIW (a version of LibreOffice runs on my Raspberry Pi 400). This extremely wide variety of systems and platforms makes LibreOffice a very flexible and wide ranging program, and makes Base available to a wider audience of users. It is also free and open source, so there is no need to purchase a license to use the software.

LibreOffice Base also has the ability to create a database project as a single file using the embedded HSQL database engine (it can also use the embedded Firebird database engine). For small teams, single users and others, this has the advantage of not requiring a full database server to be set up. If the user is working with a larger team or on a network, the LibreOffice Base project can be split into a front end and back end for use on a database server. Much like Access, it can be easily adapted to meet the needs of a wide range of users. All of this made the decision to transition to LibreOffice Base from Microsoft Access not only easy, but it really is an upgrade for the users who will be using the software.

Having resolved to transition to a new database engine, the next question was to decide if we wanted to recreate the Flight Logs program in Base, or should we start a new database program. We decided that given the educational direction of the AAEN that it would be better to start development of a new database called the “Rocketry Research Assistant.” This database will have an initial focus on tracking research project teams for various projects. Later it will be expanded to cover other areas involved in research projects. You will no doubt be able to see where certain parts of Flight Logs will be incorporated into future releases of the Rocketry Research Assistant.

We hope that you agree that this transition to LibreOffice allows us to meet so many more objectives than could ever be obtained had we continued to use Microsoft Access. We also hope that you agree with our decision to use this database development project as an educational project in itself. Finally, we hope that you agree with these decisions and will join us as we begin this new series of database development projects.

Model Rocket Calculator Spreadsheet Released

We are pleased to announce our initial release of the Model Rocketry Spreadsheet Calculator. The Calculator is available through our SourceForge repository at https://sourceforge.net/projects/model-rocket-spreadsheets. The spreadsheet includes:

  • Single Station Altitude Reduction
  • 2-station Inline Altitude Reduction
  • Parachute Size Calculator
  • Parachute Descent Rate Calculator

The altitude reduction calculators are based on the following technical reports:

The parachute calculators are based on Tech Report 9 “Calculating Predicted Altitude”.

This Project is released under the Creative Commons BY-SA 3.0. The spreadsheets were created in LibreOffice Version 7.5 using the Open Document Spreadsheet (ods) format. Both LibreOffice and the OpenDocument standard are open source. The spreadsheets should open in any spreadsheet program that can read the *.ods format, including Microsoft Excel.