The Project Manual “The Arduino Launch Control System” includes all of the information in this blog series as well as additional information about the project. You can download it from our Project Manuals page.
A Noob’s Journey
 Before I start into the nuts and bolts of this project I want you to know something. When I started this project I had less than 4 months experience working with an Arduino controller board. What’s more, I really knew nothing about electronics. I could replace a broken electrical socket in the house (and I knew enough to turn the power off before I did it), but I had no idea what a capacitor did or what a resistor was used for and why a diode could emit light.
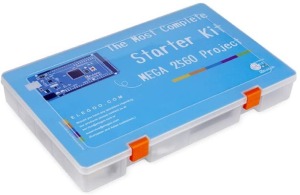 Then for my birthday my wife bought me an Arduino Starter Kit. In a few days I was surprised to be making real circuits and learning about how these little electronic gadgets work. The amazing thing is not only was I making the projects laid out in the tutorials included in the kit, I was beginning to think of new projects that I could make using the skills I had learned in just a short time.
 It also wasn’t just electronics I was learning, I was also writing ‘C’ code in the Arduino IDE (Integrated Development Environment). Prior to this any computer programming I had accomplished was in Visual Basic, Visual Basic for Applications (VBA), or Commodore BASIC (yes, I am that old). All of this was happening in just a few short weeks after receiving the starter kit.
 If this wasn’t enough, I was learning about how to document my electronic projects. I always like to document my projects. I find I refer back to them – especially if I run into similar problems in a new project. This led to learning another new skill – that of schematic drawings. The electronic drawings you will see in this series are created with a program called “fritzing” (https://fritzing.org/). It is an open source program that allows you to create not just schematics, but breadboard illustrations, PCB (Printed Circuit Board) designs and attach the Arduino code for the project.
So why did I start this series with this type of introduction? Because there are a lot of you out there that look at electronics as I did. Its a magical genie – and in some ways it is – but it is a genie that you can learn to control and make some remarkable things. Plus you will learn more than just electronics along the way.
No doubt there are some of you out there who have been building electronic projects for years. I would not be surprised if you looked at this project and laughed – seeing everything I did wrong. That’s OK, because I’m just learning. For those of you who are new to electronics or are thinking about trying an electronic project, I want you to feel free to try things and learn as well. Remember, you will learn more from your mistakes than from your successes.
As you start building this project you will no doubt have ideas of your own you may want to incorporate. That’s good! The current design uses all of the available pins in an Arduino Uno and all but 2 pins on the Nano. But don’t let that deter you. Later I’ll discuss how the system can be expanded without changing the Arduino boards.
Finally, if I can begin learning electronics at age 61, you can learn it too! Now let’s look at my first (not from a tutorial) project, the “Arduino Launch Control System” (LCS).
About the Project
This was the first Arduino rocketry project that I wanted to design and build. There are a number of Arduino launch systems available on the Internet, and these did help provide inspiration for this project. Yet while they provided some great ideas, I wanted to approach this launch control system from a different angle.
Focus on Research
If you look around our web site, you know that I often discuss how model rocketry can be used to explore both science and technology. One great way to combine these is to use model rocketry as part of a science or technology fair project.
If you are using model rocket in a research project, no doubt weather will be a part of your data collection. To help meet that need this launch control system provides the user with several weather data points, including:
- Temperature
- Humidity
- Barometric Pressure
In effect, the project has a built-in weather station.
Focus on Launch Safety
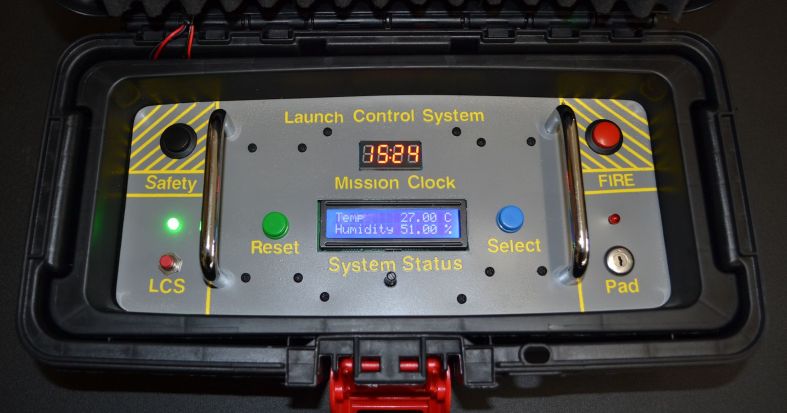
Safety is always an important consideration in rocketry. As I was designing the LCS I wanted to make sure that it would be safe to operate. The LCS provides a ten-second countdown and I wanted to be sure that when the counter hit zero, the Launch Control Officer still wanted the rocket to launch. In order for the countdown to start and power to be supplied to the launch pad, several things must be in place.
First, both power supplies must be turned on. The power must be turned on to the launch pad or there will not be any power at the igniter clips.
Second, the key switch must have the key inserted and turned on. Without the key, the switch will not turn on. Without the switch being turned on, power will not flow from the launch battery to the relay and on to the launch pad. When the key switch is turned on it also indicates if there is continuity to the igniter in the rocket.
However, if you only turn on power to the launch pad you will find that the continuity lamp will operate but the fire and safety buttons are inoperative.
You must also supply power to the Arduino. The system will not fire without the Arduino being powered up, as it reads the signals from the fire and safety buttons, which sends the signal to the relay. The relay allows the power to flow to the launch pad.
Finally we come to the Fire and Safety buttons. To start the countdown both buttons must be pressed down. Additionally, they must remain pressed down during the countdown. If either button is released, the countdown will stop and the launch is aborted.
You will notice that the fire and safety buttons are located at opposite ends of the LCS. This helps negate the possibility of an item falling on the fire button leading to an accidental launch. The use of the key switch, dual power supplies and the requirement for double buttons being pressed all brings additional layers of safety into the system to help prevent accidental launches.
Overview of the LCS Components
So what does our LCS include? In addition to the weather sensors listed above, the project includes:
- A Real Time Clock (RTC) that keeps the date and time even when power is off to the system
- Two separate power systems
- A set of 4 AA batteries for the launch pad
- A 9-volt battery for the Arduino
- Launch pad power meter
- 4-digit, 7-segment LED clock that also displays messages
- A 16×2 LCD display for weather data and system messages
- A warning buzzer that sounds during countdown and other events
- Safety key
- Continuity lamp
- Two-button fire sequence
- USB connection
Plus a few other things we’ll discuss later.
Final Design Considerations
Lastly I wanted the system to be easy to use and portable. Cause if it is not easy to take out to the flying field, no one will use it. I also tried to keep the cost low. While it does cost more than a plain Estes launch controller, it does a lot more too!
It also had to look cool. If it doesn’t look cool, well, it just has to look cool!!
In the next post I’ll look at the actual components that are used in this version of the Arduino LCS.
